Email: Dashboard Email Widgets
The new Email Widgets for Gold Star Pro offer a powerful, visual way to monitor your email performance on your dashboard. With these widgets, you’ll be able to dive deeper into key email metrics, gain actionable insights, and make informed, data-driven decisions.
Discover how to set up both predefined and custom widgets to track crucial statistics such as open rates, click-throughs, and deliverability directly on your Gold Star Pro dashboard.
Getting Started with Predefined Email Widgets
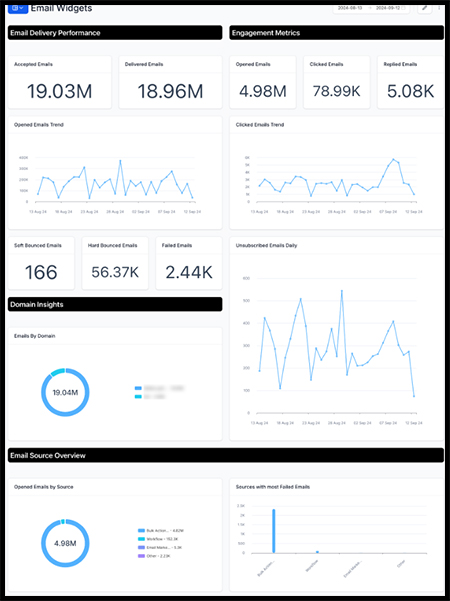
Gold Star Pro provides a variety of predefined widgets to simplify tracking your email metrics. Here’s an overview of each widget type:
Accepted Emails: Shows the number of emails successfully accepted for delivery.
Delivered Emails: Tracks emails successfully delivered to recipients.
Opened Emails: Displays the count of emails opened by recipients.
Clicked Emails: Tracks emails where links were clicked by recipients.
Replied Emails: Counts the number of emails that received responses.
Soft Bounced Emails: Shows emails with temporary delivery issues.
Hard Bounced Emails: Indicates emails that couldn’t be delivered due to permanent issues.
Failed Emails: Counts unsuccessful email deliveries.
Unsubscribed Emails: Tracks the number of recipients who opted out of future emails.
Unsubscribed Emails Daily: Provides a daily count of unsubscribes.
Emails By Domain: Groups emails by recipient domain, helping you understand which domains your emails reach.
These predefined widgets make it easy to begin tracking vital email statistics right from your dashboard, saving you time while providing a comprehensive view of your email campaign’s success.

Setting Up Custom Email Widgets
For more tailored insights, you can create custom widgets by applying specific filters and selecting preferred visualizations. Here’s a step-by-step guide:
Open Your Dashboard: Go to your Gold Star Pro account dashboard.
Enter Edit Mode: Click on the edit icon to start adding widgets.
Add a Widget: Select "Add Widget" from the options.
Go to the Emails Section: Scroll to the "Emails" category to see available widget options

.
Choose Predefined or Custom Widgets:
To use a predefined widget, simply select it from the list.
To customize, apply filters (such as Source, Status, Sent By, Domain) and choose your preferred chart type.
Save Your Widget: Click "Save" to finalize your widget setup and add it to your dashboard.
These custom widgets allow you to filter by Source (like workflows or campaigns) and other details, giving you more control over your data and insights.
Key Benefits of Email Widgets
Email Widgets in Gold Star Pro are designed to help you understand and optimize email engagement. Here’s how they can help:
1. Quick Performance Overview
See a snapshot of essential email metrics—like open rates, clicks, and bounce rates—without needing to navigate through complex reports.
2. Engagement Insights Across Sources
Track performance across multiple email sources, such as Workflow, Email Marketing Campaigns, and Bulk Actions, all from one place.
3. Detailed Data and Interaction
Click on charts for detailed data, making it easier to refine your email strategies based on real-time insights.
4. Downloadable Data
Export email performance data as a CSV file directly from your dashboard for team sharing and further analysis.
Important Tips for Using Email Widgets
To get the most out of your widgets, keep these tips in mind:
Group by/View by Options: When using Group by or View by features, ensure you select a specific source first, then choose the same source in the Group by/View by fields for the most accurate results.
With these widgets, your Gold Star Pro dashboard becomes a powerful tool for managing, analyzing, and enhancing your email outreach.

